With cloud printing, your Epson receipt printer receives new orders from SOUS over the internet and prints them by itself. You only need to set it up once, and it takes about 20 to 30 minutes. This guide is for the Epson TM-m30III. Would you rather do it together? Contact us and we'll go through it with you.
What you need
• Your Epson printer, switched on and with paper in it.
• A network cable, or the name and password of your Wi-Fi network.
• A laptop or phone connected to the same network as the printer.
• The printer's admin password. You'll find it on the label on the printer, next to the lock icon.
• Access to the SOUS portal.
Step 1: Add the printer in the SOUS portal
1. In the SOUS portal, go to Orders > Settings > Printing and choose the right location.
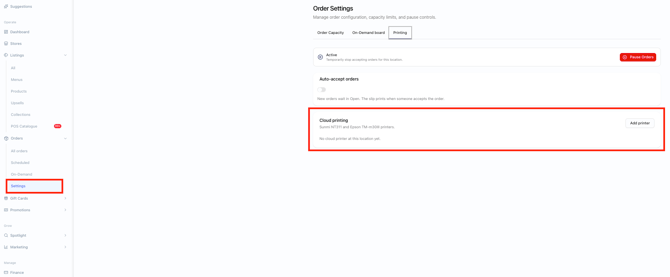
2. Click Add printer and choose Epson.
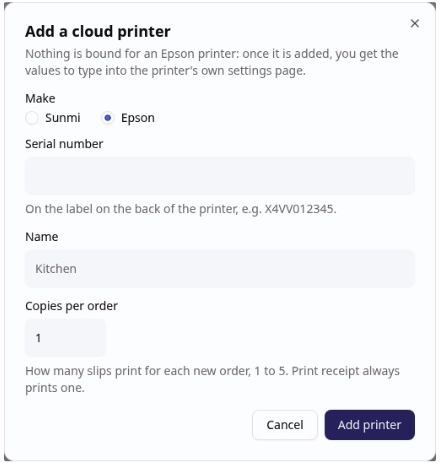
3. Serial number: copy it from the label on the back of the printer, for example X4VV012345. Watch out for 0 and O, and 1 and I.
4. Name: the name your kitchen uses for this printer, for example Kitchen or Bar.
5. Copies per order: how many slips you want for each new order, from 1 to 5.
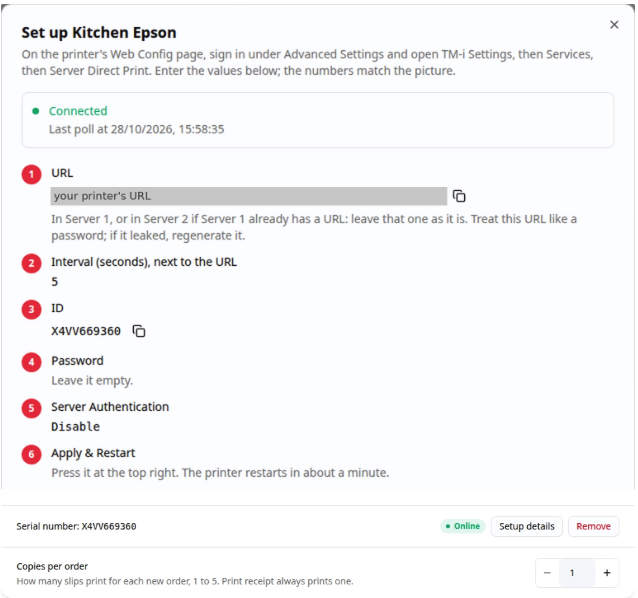
6. Click Add printer. A setup card opens with the details you'll need later. Keep it open: it updates by itself.
Step 2: Connect the printer to your network
Plug the printer in, load paper, switch it on and wait about 40 seconds.
Wi-Fi from the printer itself
1. Open the paper cover. Hold the Feed button (the small button with the paper icon) until the paper light flashes, then let go.
2. Close the cover. A sheet starting with "Next Action" prints.
3. Press Feed 5 times quickly, then hold it for more than one second. A "SimpleAP Start" sheet prints.
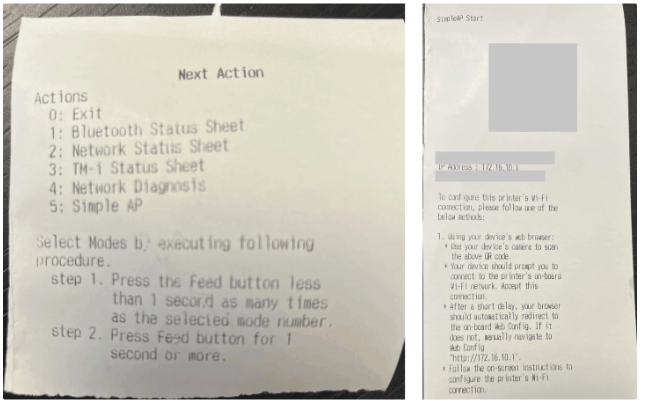
4. Scan the QR code on the sheet with your phone camera to join the printer's own Wi-Fi. If asked for a password, use the serial number.
5. The printer's settings page opens on your phone. If it doesn't, go to http://172.16.10.1 in your browser.
6. Choose Wi-Fi, log in with the admin password from the label if asked, choose your restaurant's Wi-Fi network, enter its password and tap OK.
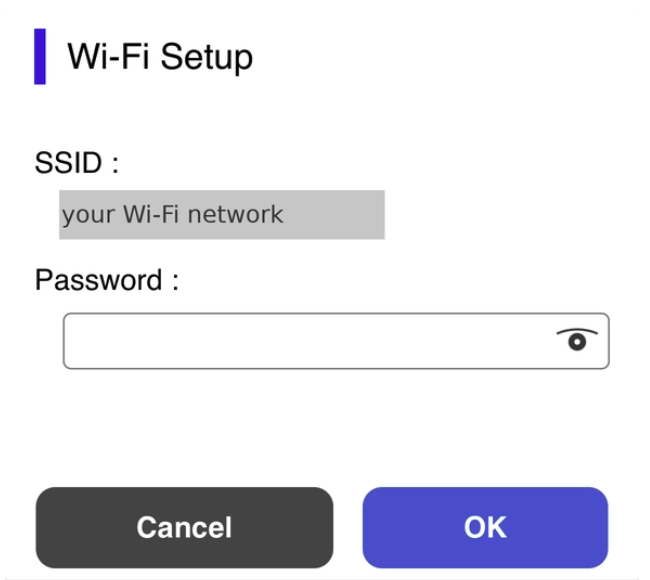
7. The printer is connected when its Wi-Fi light stays on.
Good to know: the printer can't join a network called "EpsonNet", and works best away from the microwave.
Step 3: Open the printer's settings page
1. Find the printer's IP address. It's on the sheet the printer printed in step 2. Don't have it? Print a network status sheet: open the cover, hold Feed until the paper light flashes, close the cover, then press Feed twice and hold it for one second. Don't use 172.16.10.1: that's only the printer's setup address.
2. On a laptop or phone connected to the same network, type https:// followed by the IP address in your browser, for example https://192.168.1.50.
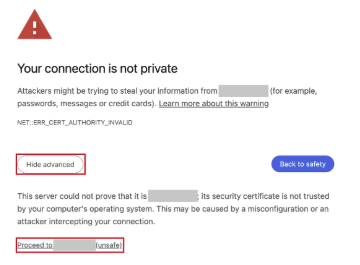
3. Your browser warns "Your connection is not private". This is normal for the printer's page. Click Advanced, then Proceed.
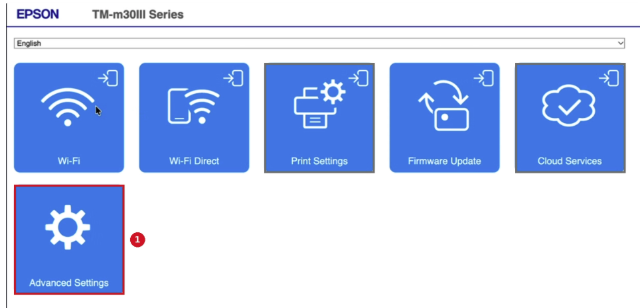
4. The printer's home page opens. Only use Advanced Settings. Don't change anything under Print Settings or Cloud Services, as these change how the printer works.
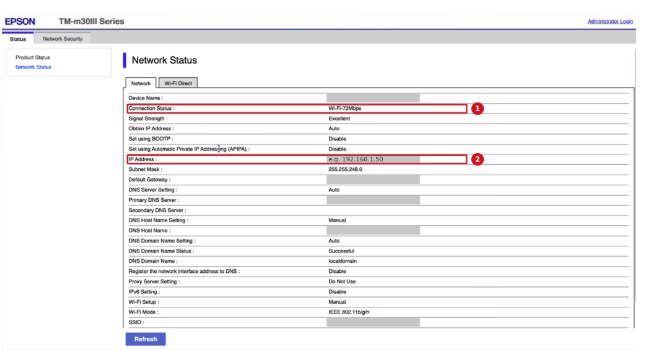
Want to check the connection? Go to Advanced Settings > Status > Network Status. It shows the connection (1) and the IP address (2).
Step 4: Check the software version and the clock
Go to Advanced Settings > Status > Product Status. You don't need a password for this.
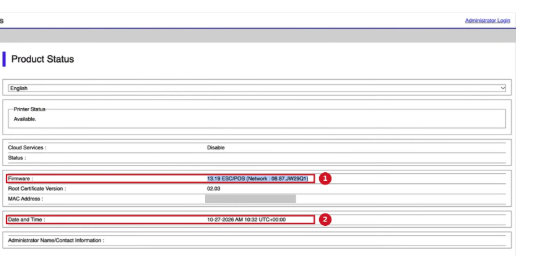
• Firmware (1): the number must be 13.15 or higher, for example 13.19. Is it lower? Go back to the home page, choose Firmware Update, log in and click Start. When the new version is found, take the paper roll out, tick Accept and click Start. This can take up to 20 minutes: don't switch anything off in the meantime.
• Date and Time (2): must be correct. If it shows UTC+00:00, the time should be 1 hour behind the Netherlands and Germany in winter (2 hours in summer), or 2 hours behind South Africa. With a wrong clock, the printer can't connect to SOUS.
Clock wrong? Go to Advanced Settings > Administrator Login > Device Management > Date and Time > Time Server. Set Use Time Server to Use, enter pool.ntp.org and click OK. After a minute it shows "Completed synchronizing".
Step 5: Log in
Go to Advanced Settings > Administrator Login and enter the admin password from the label on the printer.
Step 6: Add the two SOUS certificates
The certificates let your printer connect safely to SOUS. Without them, the printer can't connect. You need to add both.
1. On the setup card in the SOUS portal, download both certificate files to the laptop or phone you're using.
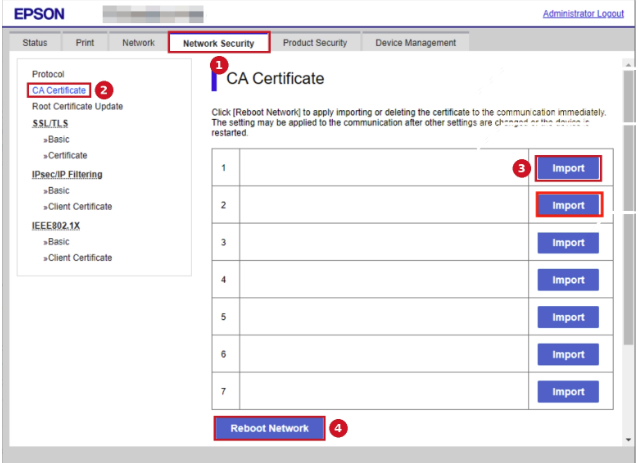
2. On the printer's page, open the Network Security tab (1) and click CA Certificate (2).
3. Click Import in the first empty row (3).
4. Click Browse (1), choose the first file and click OK (2).
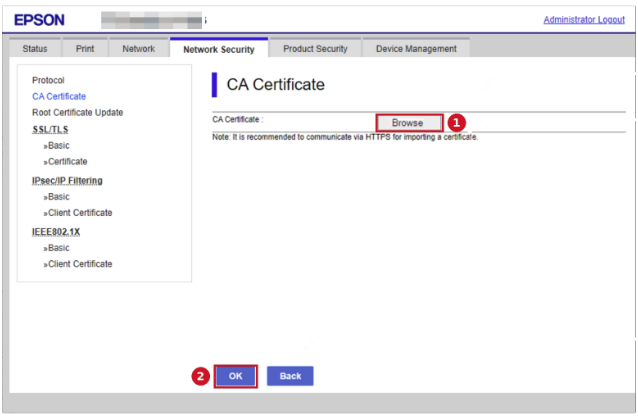
5. Click Import in the next empty row and do the same for the second file.
6. Click Reboot Network (4), confirm, wait about a minute and log in again.
Step 7: Enter the SOUS details
Go to TM-i Settings > Services > Server Direct Print. Take a photo of the page before you change anything. Then fill in the details from your setup card. The numbers on the card match the fields on this page:
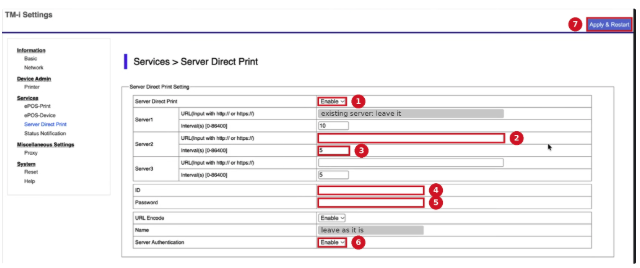
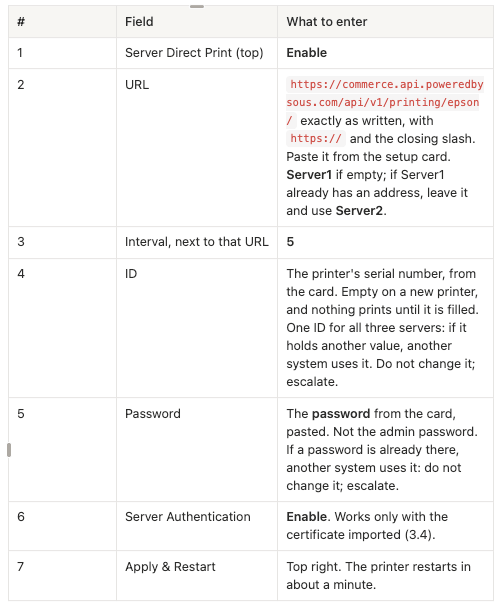
1. Server Direct Print: set to Enable.
2. URL: copy it from the setup card exactly as it is. Put it under Server1 if that's empty. If Server1 already has an address, leave it and use Server2 instead.
3. Interval, next to that URL: enter 5.
4. ID: copy it from the setup card.
5. Password: as shown on your setup card.
6. Server Authentication: as shown on your setup card.
7. Click Apply & Restart at the top right. The printer restarts in about a minute.
Leave URL Encode and Name as they are. If the ID or Password field already contains something, another system is using it: don't change it, and contact us. After restarting, the page may ask you to log in again with "401 Authorization Required". That's normal, you can close the page.
Keep the URL and password from your setup card private: don't share them in group chats or emails.
Step 8: Test your printer
1. Watch the setup card in the portal. Within about 2 minutes, Waiting for the printer... changes to Connected.
2. Click Test print. A slip prints with TEST PRINT, your location and printer name, and the text "This printer is ready for orders."
3. Close the setup card. Your printer now shows Online in the list.
Finishing up
• Change the admin password: go to Advanced Settings > Product Security > Change Administrator Password and choose a new password of 8 to 20 characters. Keep it somewhere safe, as you'll need it whenever you change the printer's settings.
• Check Auto-accept: in Orders > Settings > Printing you can turn Auto-accept on or off. When it's off, a slip prints when you accept an order. When it's on, it prints as soon as the order comes in.
Printer not connecting?
Still on Waiting for the printer... after 5 minutes? Check that:
• the printer's clock is correct (step 4)
• the firmware is 13.15 or higher (step 4)
• both certificates are added (step 6)
• the URL is copied exactly, including the slash at the end (step 7)
Still not working? Contact us and we'll help you.